Prelude
The GitHub repository, or repo for short, for this website is located at https://github.com/edwinksl/edwinksl.github.io. Issues, pull requests, comments and suggestions are welcome!
Introduction
This website is set up using Pelican as the static site generator, Google Domains for registering a custom domain and Netlify for hosting the website. The choice of a static site generator is arbitrary and I picked Pelican because it is written in Python and is the most active among various Python static site generators that I am aware of. The main motivation for using Netlify instead of GitHub Pages is because GitHub Pages does not support SSL for custom domains. See this epic GitHub issue for complaints and workarounds regarding this problem.
This post seeks to summarize the steps for setting up a website using Pelican, Google Domains and Netlify, and is based on the following excellent documentation, guides and tutorials:
- Pelican's documentation
- Netlify's guides for hosting a Pelican website on Netlify and setting up a custom domain
- Netlify's documentation for continuous deployment and enabling HTTPS
The instructions are given for Ubuntu, specifically Ubuntu 17.04, but they should generalize well to other Linux distributions and operating systems.
Custom domain
- Register for a custom domain. I registered mine at Google Domains, so the instructions for this post are based on that. The procedures for setting up a custom domain with Netlify are slightly different for different domain name registrars, which we will discuss later.
Pelican
-
We will use a virtual environment, which is commonly abbreviated as virtualenv, to manage the Python dependencies. Therefore, we first install
virtualenv:sudo apt update sudo apt install virtualenv
-
Create and activate a virtualenv in the Git repo for the website. My Git repo is located at
~/git/edwinksl.github.io/, so the commands are:cd ~/git/edwinksl.github.io/ virtualenv venv -p python3.6 # create a virtualenv for Python 3.6 source venv/bin/activate
If you prefer Python 3.5, change
python3.6topython3. If you prefer Python 2.7, omit-p python3.6and run justvirtualenv venv. Remember to addvenv/to.gitignoreas we are not interested in keeping it under version control. Thepipthat is shipped with Ubuntu can be buggy, so I usually force-upgradepipright after activating a new virtualenv as follows:pip install -U --force-reinstall pip
-
Use
pipto installpelicanand other optional packages, namelyMarkdownandtypogrify:pip install pelican Markdown typogrify
-
Follow either the quickstart tutorial or the detailed documentation to set up Pelican and write content. The basic workflow consists of running
make devserverto serve the website locally at http://localhost:8000/, iterate content writing and finally runningmake stopserverto stop the development server. -
In the root of the Git repo, add a file named
CNAMEthat contains the custom domain. In my case,CNAMEcontainswww.edwinksl.com. -
Ensure that
CNAMEis copied to the root of theoutputdirectory by adding the following lines topelicanconf.py:STATIC_PATHS = ['../CNAME'] EXTRA_PATH_METADATA = {'../CNAME': {'path': 'CNAME'}} -
If you are not using themes and plugins, please skip this step. If you are using themes and plugins, please visit http://docs.getpelican.com/en/stable/settings.html#themes and http://docs.getpelican.com/en/stable/plugins.html#plugins respectively for how to specify them in
pelicanconf.py. For Netlify to build and deploy the website, all the themes and plugins used need to reside in the Git repo. Because the Git repos for themes and plugins exist outside the website Git repo, we have to include them in our website Git repo using either Git subtrees or submodules. You can google "git subtree vs submodules" for various opinions on which to use, but I personally prefer subtrees, so that is what we will use here. A quick tutorial for using subtrees can be found at https://www.atlassian.com/blog/git/alternatives-to-git-submodule-git-subtree. We first fork thepelican-themesandpelican-pluginsGitHub repos and add remotes for them. We then use thegit subtree add -Pcommand to add the directories for themes and plugins. The commands required are:git remote add pelican-themes https://github.com/edwinksl/pelican-themes.git git remote add pelican-plugins https://github.com/edwinksl/pelican-plugins.git git subtree add -P pelican-themes pelican-themes master --squash git subtree add -P pelican-plugins pelican-plugins master --squash
Lastly, we update
.gitignoreto only put the used themes and plugins under version control. In my case, I use thepelican-bootstrap3theme andrender_mathandi18n_subsitesplugins, therefore the lines to be added to.gitignoreare:pelican-themes/* !pelican-themes/pelican-bootstrap3/ pelican-plugins/* !pelican-plugins/render_math/ !pelican-plugins/i18n_subsites/
To update the themes and plugins, we do
git subtree pull -Pas follows:git subtree pull -P pelican-themes pelican-themes master --squash git subtree pull -P pelican-plugins pelican-plugins master --squash
-
Netlify requires
requirements.txtfor building the website, which can be generated by running:pip freeze > requirements.txt
If you notice that
requirements.txtcontainspkg-resources==0.0.0, which is a bug, then run the following command instead:pip freeze | grep -v "pkg-resources" > requirements.txt
-
By default, Netlify uses Python 2.7.4 to build the website. We instead want to use the latest version of Python 3 that is available in Netlify, which is 3.5.2. To do so, we add a file named
runtime.txtthat contains3.5.2. -
Finally, we can run
tree -a -L 1to see how the structure of the root directory looks like. In my case, it looks like:. ├── CNAME ├── content ├── develop_server.sh ├── fabfile.py ├── .git ├── .gitignore ├── LICENSE.md ├── Makefile ├── node_modules ├── output ├── package-lock.json ├── pelicanconf.py ├── pelican.pid ├── pelican-plugins ├── pelican-themes ├── publishconf.py ├── __pycache__ ├── README.md ├── .remarkrc -> /home/edwinksl/.remarkrc ├── requirements.txt ├── runtime.txt ├── srv.pid └── venv
You will notice that there are several files and directories that we have not talked about, but they are beyond the scope of this post.
Netlify
- Visit Netlify and follow the instructions at https://www.netlify.com/blog/2015/10/15/a-step-by-step-guide-pelican-on-netlify/ from the section "Connecting to Netlify" onwards; the sections that come before this have been already been covered in greater detail in this post. The only modification I have made to these instructions is to use
make publishinstead ofpelican contentas the build command so that the settings inpublishconf.pyare taken into account. -
Follow the instructions at https://www.netlify.com/blog/2016/03/14/setting-up-your-custom-domain/ to connect Netlify with the custom domain. For instructions specific to Google Domains, see https://www.netlify.com/blog/2016/03/14/setting-up-your-custom-domain/#googledomains. Note that the correct IPv4 address to use is
104.198.14.52, which unfortunately is contradicted by what is shown in the erroneous screenshots. Here is a screenshot of my custom resource records in Google Domains: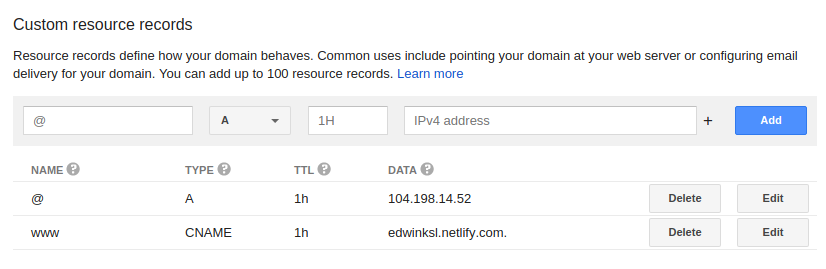
-
Turn on SSL for the website by following the instructions at https://www.netlify.com/docs/ssl/. After you have verified that SSL works, I suggest turning on "Force TLS connections", which "will both set a redirect from http to https, and add
Strict Transport Securityheaders to all requests".
Bells and whistles
- Visit Qualys SSL Server Test to analyze how well SSL is configured on the website. We should expect to see an overall rating of A+.
-
Set up Google Analytics. For the
pelican-bootstrap3theme, add the tracking ID and turn on automatic cookie domain configuration by adding the following lines topublishconf.py:GOOGLE_ANALYTICS_UNIVERSAL = 'UA-100873462-1' # use your own tracking ID here GOOGLE_ANALYTICS_UNIVERSAL_PROPERTY = 'auto'
-
Connect Google Search Console to Google Analytics and set the preferred domain, which is
www.edwinksl.comin my case.
Comments
comments powered by Disqus